Ok so when I opened my first shop concentrating on my fine art and illustration it was tough... I didn't know how to market it, I was just kinda thowing coins in the air and seeing where they lay. It took me a year to get 6 sales on etsy. When we started the Sunflower Express shop Knowing what I have learned in Marketing the show and running that business on a completely different level, I think I started to approach the new etsy shop in a completely different way.
Marketing is key. I use all of my social skills to market sometimes it is completely overwhelming how much time I actually spend marketing. Of course this takes some of the fun out of the whole creating for a living thing but IT WORKS.
I love seeing what other people are working on and how they interpret life thru what they create... You can tell A lot about someone based on what they create. I'm drawn to the quirky stuff on etsy... I can spot a fellow quirkster a mile away.
Our intention was to create lots of stuff for kids but the whole CPSIA nonsense kinda killed that. I create stuff for adults mostly now... kids really love our cuff bracelets and button rings. Hopefully if the stupid law can get changed or repealed I can go back to doing that in the future. But the line is taking off.
We got some of our notecards in a boutique in Berlin Maryland called A Perfect Touch on Main Street. Its the cutie little town where they shot the movie Runaway Bride. Which is very cool if only for the fact that I love that movie.
I'm learning to branch out. To not be scared and to just get out there and mix it up. I know alot about alot of things just thru my experiences in graphic design and illustration thru SSC A&D. I don't mind sharing and I utilize etsy's forum to share my knowledge and also to draw from the knowledge of everyone else in that very diverse and knowledgeable community.
Most importantly I have learned that I've got good taste and if you work your ass off and are slightly anal retentive you can put out a whole lotta work! AND you can start to sell.
Our shop got off the ground for real in the beggining of May I now have 3 sales. Not bad in a month and a half especially with a line that is very different from most jewelry out there. I hope to continue to find out niche market and capitalize on the cool, unique factor of our stuff.
Sunflower Express will continue to get out there and do the whole craft circuit and I'm seriously persuing wholesaling now. I also would love to approach other blogs about doing a feature. I'm no media whore by any means... I'm waiting for the show to take off so we can hire a Ms. Crafty... (I'm joking, Maybe not joking lol...) But exposure is a plus!
Monday, June 22, 2009


Tuesday, May 19, 2009
New Products and New Demensions or why I love Felt!

I started with pendants. I love the fact that people don't know that they are felt when they look at them... They are substantial statement pieces that are totally affordable and with everyone selling off their gold and silver why not have a blinged out textile piece that says fun or elegant, that also can't be pawned in a moment of deperation!
Since the pendants I have started to move on with the addition of bracelets or felt cuffs with fun and sophisticated patterns for adults and kids. Currently I am designing earings and even rings embellished with buttons and beads. I primarily use wool and eco fi. I realy enjoy the wool felt as it is way more durable and the colors a bit more subdued than the lollipop kaleidescope of Polyester felt!
Felt is such a luscious material it deserves better treatment and to be moved from the bottom of the craft food chain.
visit my etsy shop to see what I mean!
www.sunflowerexpress.etsy.com
Sunday, May 3, 2009
Modern Networking or this Crap really does work...
So I've always wondered about ways to draw more attention to our little show and shop... but how do you do that without being chained to a computer 24/7 and still have a family a life outside yourself and still get your craft on?
Ok so I've read alot about setting up a facebook fan page. That was step one. It's pretty simple just make sure you follow facebooks instructions and click on the linky poo for the create a page for a business. It's pretty easy after that... you upload a few pictures and put some content up there and there you go!
The second step which is equally helpful especially if you are craft fairing this season, Mix and Mingle and slap that business card and/or flyer in that bag! We have gotten some really great business leads just from talking to customers and fellow crafters about what we are doing. Being social is key! Make sure you have a mailing list for people to sign up on and hand your flyers out to everyone who stops by... yes this is marketing in real time vs. webtime... BUT... people who see your work and like it, but don't have a need for something you are selling, might come back around later on if they stumble upon your card or you signed them up for a mailing list and are regularly sending them information. Even in this modern era this still works!
Ok so I read some really great information about twitter on Timothy Adams blog, It was basically about how to get followers.... Seems simple right???? But this can be daunting... It's pretty simple just find people who's things you love or who have businesses you like to get started add some of their followers. I basically searched for etsy and went thru some of those... Get your friends, look for people who do what you do or who do something similar. Initially might take you a few minutes of searching and following people but most of the time those people follow you right back! Most people do have twitter and post your twitter feed info on your facebook... Post your twitter follow me button or feed on your blog, on your website and tell everyone you can follow me on twitter. In a few hours I'm up to 88 followers... in a few hours! I'm hoping this will lead to more traffic here and to the sunflowerexpress website and eventually to sales popping off in my etsy shop.
Break the marketing down in to phases and set yourself some acheivable goals and if you are anything like me you will only have to spend a couple of hours online a week devoted to managing your "networking empire".
I'll post updates on our progress!
Ok so I've read alot about setting up a facebook fan page. That was step one. It's pretty simple just make sure you follow facebooks instructions and click on the linky poo for the create a page for a business. It's pretty easy after that... you upload a few pictures and put some content up there and there you go!
The second step which is equally helpful especially if you are craft fairing this season, Mix and Mingle and slap that business card and/or flyer in that bag! We have gotten some really great business leads just from talking to customers and fellow crafters about what we are doing. Being social is key! Make sure you have a mailing list for people to sign up on and hand your flyers out to everyone who stops by... yes this is marketing in real time vs. webtime... BUT... people who see your work and like it, but don't have a need for something you are selling, might come back around later on if they stumble upon your card or you signed them up for a mailing list and are regularly sending them information. Even in this modern era this still works!
Ok so I read some really great information about twitter on Timothy Adams blog, It was basically about how to get followers.... Seems simple right???? But this can be daunting... It's pretty simple just find people who's things you love or who have businesses you like to get started add some of their followers. I basically searched for etsy and went thru some of those... Get your friends, look for people who do what you do or who do something similar. Initially might take you a few minutes of searching and following people but most of the time those people follow you right back! Most people do have twitter and post your twitter feed info on your facebook... Post your twitter follow me button or feed on your blog, on your website and tell everyone you can follow me on twitter. In a few hours I'm up to 88 followers... in a few hours! I'm hoping this will lead to more traffic here and to the sunflowerexpress website and eventually to sales popping off in my etsy shop.
Break the marketing down in to phases and set yourself some acheivable goals and if you are anything like me you will only have to spend a couple of hours online a week devoted to managing your "networking empire".
I'll post updates on our progress!
Saturday, May 2, 2009
Notes from the Montpelier Festival of Herbs, Tea and the Arts

I figured our first post should be from a Craft Fair! We survived the threat of rain and the turn out has been better than expected. It stayed cloudy and cool and It was so fun to meet other crafters and just being outdoors in the beautiful Montpelier Setting was amazing!
Well as you know we are relatively new to the craft fair circuit and thru trial and error have realized that picking great fairs has alot to do with your target audience. We have been to a few bummers that had us doubting our confidence... But the trick is to remember that your products are not always going to be a right fit for the fairs you are attending and even careful research can yeild a hit or miss.
Our Strategy is that generally we sell products that appeal to adults and we sell lots of kid stuff but our market is a more indie, city dwellers than country market. Our goal for our Craft fair scheduling this season is to stick to what we know and stay in the DC Metro Area. For the remainder of our craft fair season we will be mostly in PG County and then a couple of stops near the chesapeake.
Another tip we learned in tweaking our display this week was to dial back on the table cloth motif... we went with a crazy display last time that had way to many colors and distracted from the colorful nature of our product line. I love light blue and thought that light blue would be a subtle color that would help our stuff stand out but not be too busy. After a quick trip to Joanns where we settled on an okay color... we got to the cutting table and realized that the fabric would cost us 50!!! dollars... I was like okkkkkkk lets go to target and get a sheet. Cynt and I picked out the most perfect minty blue and I really think that that change made people linger longer over our table.

We had some really great conversations and the one product we didn't think we'd sell that much of, our logo T shirts for kids we actually sold 3!!! Since our TV show is new and noone has heard of it we didn't know how it would go over. It just goes to show how far a good design will go! We've had several adults ask for big people sizes and we are mulling it over...
Wednesday, April 29, 2009
Lots of art on the horizon
Ok so Sunflower Express (the kids TV show I have been working on for almost a year now) has debuted episode 2. We are currently on Tour so to speak, hitting the local craft fair circuit. It is ridiculously exhausting yet fun at the same time... to take a look at the new Sunflower Express product line please visit www.sunflowerexpress.etsy.com... to view episode 2 visit www.sunflowerexpress.com . I'm currently getting ready for the Montpelier Herb and Tea fest on Saturday and its a slow crawl until June where we end in Ocean City. Sunflower Express also has a facebook fan page (search for sunflower express). Coming soon is the Sunflower Express Handmade blog where I will be blogging about crafting, building a brand and our craft fair experiences and tips!
Tuesday, March 17, 2009
A Double Sided Business Card Mini Brochure
A Mini Brochure
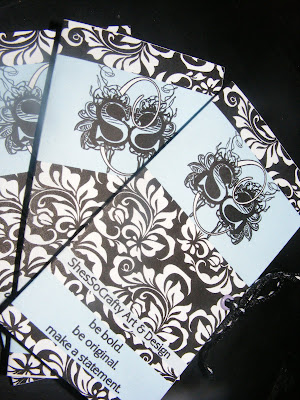
So I was needing to update my promotional materials and I thought this would be a good time to use a really cool technique to Create a mini brochure Business Card size.
Let's go thru the process.
Personally I'm an instant gratification type of girl and I like to be able to print my stuff myself and not wait until I've sent my docs off to the printer to see how it works, so I test drove some of the new features in Illustrator CS4 to Set up the card and print it.
In the newest version of Illustrator it is very easy to set up double sided printing because they give you the use of multiple artboards on your screen.
For this card you need to set up the document to have multiple Artboards and you do this from the New Document screen.
 Where it says number of Artboards change that to 2. In the width and height change that to 4 inches wide and 3.75 inches high. This will create two art boards that are double business card size. You can size these up a bit to fit your purposes.
Inside of Illustrator you will find two art boards side by side that are constrained to your specified size. The next step is to start on your design. Turn your rulers on and set up your guides for bleed and for the fold at 2 inches on both boards and begin laying out your design.
The front of your document should be on the left artboard with the front cover actually on the right and the back cover actually on the right. On the second Artboard the text for the left inside should be on the left and the right inside text will be of course on the right.
Complete your design and then go ahead and print it out using the illustrator print options.
You need to have some knowledge of how your printer handles double sided prints. For me it was easiest to print the cards one at a time and flip the paper each time to get the print on the back.
When you are ready to get really fancy you can create a new document and layout multiple cards using copy and paste but your placement needs to be precise. Use your rulers and remember to place each front and back in exactly the same place on each artboard, re sizing each artboard when finished to remove any dead or negative space. Your finished product will look something like the finished product below. If you are sending to a printer to print the rest it is best to convert all of your text to outlines to avoid text issues and save as an EPS and then distill it to a single PDF document. I hope this helps anyone who designs on how to get a proof printed at home with double sided printing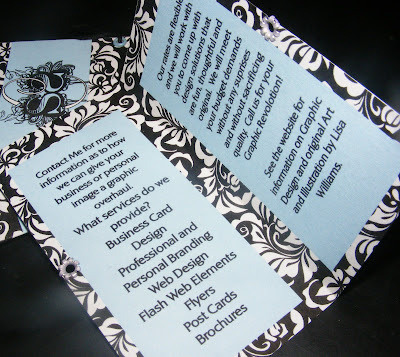

So I was needing to update my promotional materials and I thought this would be a good time to use a really cool technique to Create a mini brochure Business Card size.
Let's go thru the process.
Personally I'm an instant gratification type of girl and I like to be able to print my stuff myself and not wait until I've sent my docs off to the printer to see how it works, so I test drove some of the new features in Illustrator CS4 to Set up the card and print it.
In the newest version of Illustrator it is very easy to set up double sided printing because they give you the use of multiple artboards on your screen.
For this card you need to set up the document to have multiple Artboards and you do this from the New Document screen.
 Where it says number of Artboards change that to 2. In the width and height change that to 4 inches wide and 3.75 inches high. This will create two art boards that are double business card size. You can size these up a bit to fit your purposes.
Inside of Illustrator you will find two art boards side by side that are constrained to your specified size. The next step is to start on your design. Turn your rulers on and set up your guides for bleed and for the fold at 2 inches on both boards and begin laying out your design.
The front of your document should be on the left artboard with the front cover actually on the right and the back cover actually on the right. On the second Artboard the text for the left inside should be on the left and the right inside text will be of course on the right.
Complete your design and then go ahead and print it out using the illustrator print options.
You need to have some knowledge of how your printer handles double sided prints. For me it was easiest to print the cards one at a time and flip the paper each time to get the print on the back.
When you are ready to get really fancy you can create a new document and layout multiple cards using copy and paste but your placement needs to be precise. Use your rulers and remember to place each front and back in exactly the same place on each artboard, re sizing each artboard when finished to remove any dead or negative space. Your finished product will look something like the finished product below. If you are sending to a printer to print the rest it is best to convert all of your text to outlines to avoid text issues and save as an EPS and then distill it to a single PDF document. I hope this helps anyone who designs on how to get a proof printed at home with double sided printing


Monday, March 16, 2009
The Anatomy of a Logo
 Ok so I have gotten a few comments on the Logo and I figured this would make a really good blog post. Some people find text based logos overdone and boring but I would like to just say pish posh. You know all those really cool decorative fonts that are just lingering on your computer that you've horded looking for the right place to use them? This would be the time to dust those bad boys off and have a go at creating a refreshingly simple logo.
For the Shes So Crafty Logo I started with a sketch of intersecting Ss and a looping scripted C that ties them together. I think the sketch is the most important part, granted you could just sit down and fiddle with your letters till you get em right but, starting with a basic sketch lets you know where to start and streamlines your process. Once I had the sketch done I spent some time in my font viewer software hunting. I wanted a very ornate font for the intersecting Ss and a pretty simple scripted C to tie them both together.
I contemplated several choices for the Ss and finally decided on VTKS Revolt, For its nifty flourishes but simple easily readable letter styles.
Next step was the layout in Illustrator. I decided that the second S should be reversed, which gave it a kind of quirky feel. Now I needed a Scripted C that was less ornate but still fit with the flourishy touches of the S.
I settled for an oldy but goody AT Mahogony Script with its simple curves and the loop on the scripted C which gave the logo balance. I centered the C in the middle of the two S Coverted it to outlines so that I could further manipulate the C to intersect in the right spaces. I kept the C in just outlines to balance the heavy color of the flourishes in the Ss. And Voila. A fresh take on the standard Text based Logo. Most of the time when you think text based logo you are thinking of something more utilitarian, but as you can see this result is fresh and elegant yet simple in its conception. Dust off those fonts and give this new take on a graphic design classic a whirl!
Subscribe to:
Posts (Atom)